
Shopping Lists: The Complete Guide to Shared Grocery Shopping
Sending your au pair to the grocery store shouldn't mean a flurry of WhatsApp messages asking "Which milk?" or "Is this the right brand?" AuPairSync's shopping lists let you create detailed, shared lists that update in real time — so everyone knows exactly what to buy, what's already in the cart, and what it cost.
Why Shared Shopping Lists Matter
Grocery shopping is one of the most common tasks families delegate to au pairs — and one of the most frustrating when communication breaks down. With AuPairSync's shopping lists, you can:
- Create detailed lists with notes and alternative preferences
- See items checked off in real time while your au pair shops
- Keep a running history of frequently purchased items for faster list creation
- Track expenses and submit reimbursement claims with receipt photos
- Discuss items directly within the list's built-in chat
What You'll Learn
In this guide, you'll discover how to:
- Create a new shopping list and add items
- Use draft mode to prepare lists before sharing
- Assign lists to specific family members
- Check off items and track progress in real time
- Complete a shopping trip with notes and receipt photos
- Submit and manage expense claims
- Use smart suggestions to speed up list creation
- Communicate about items using the built-in chat
Step 1: Navigate to Shopping
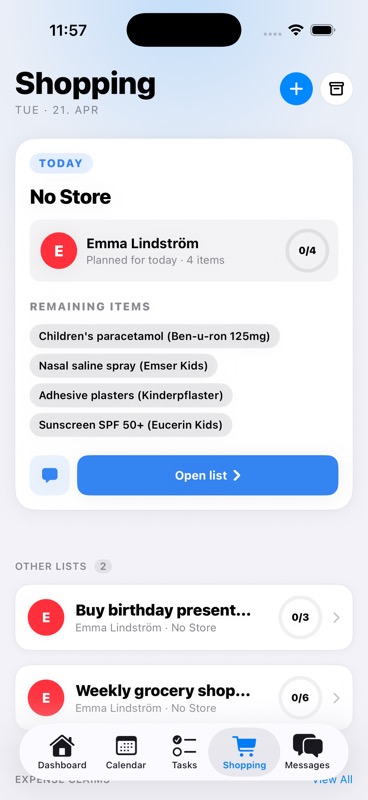
Open AuPairSync and tap the Shopping tab in the bottom navigation bar. You'll see the shopping overview screen with two sections:
- Draft Shopping Lists — Lists you're still preparing (only visible to you)
- Open Shopping Lists — Lists that are ready to shop and shared with the assigned person
Each card shows the list title, store, number of items, who it's assigned to, and progress (e.g., "2 of 4 completed").
Step 2: Create a New Shopping List
Tap the Create New Shopping List section at the top of the screen. A form opens with these fields:
List Name
Give your list a clear, descriptive title. Good examples:
- "Weekly grocery shopping"
- "Buy birthday present for Sophie"
- "School supplies for Monday"
Select a Store (Optional)
Tap Select Store to pick from your family's saved stores, or add a new one. Stores remember location details and notes (e.g., "has a good organic section"), so your au pair knows exactly where to go.
Ready for Shopping Toggle
This is a key setting:
- Off (Draft mode) — The list stays private while you add items and finalize details. Only you can see it.
- On (Ready to shop) — The list is immediately visible to the assigned person and they can start shopping.
Pro tip: Start in draft mode when you're building a list over a few days, then flip the toggle when it's time to shop.
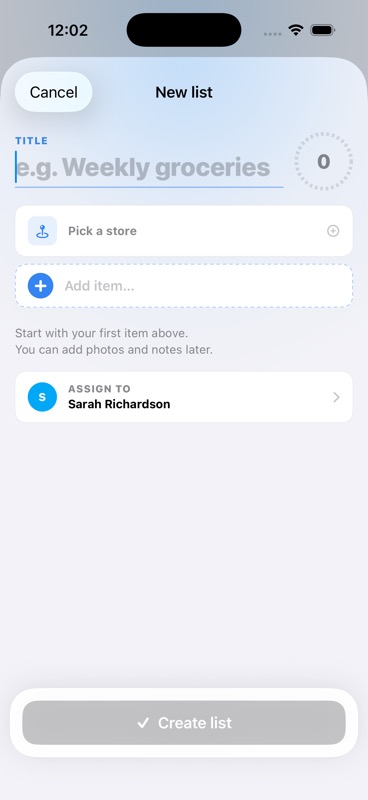
Add Items
Type an item name in the Add Item field and tap Add. You can include quantity and details right in the name (e.g., "2x milk, 3.5% Weihenstephan brand preferred").
For each item, you can also set:
- Notes — Specific instructions like "From the bakery section, sliced"
- Photo — Take or attach a reference photo of the exact product
- Alternative OK — Toggle this on if your au pair can substitute a similar product when the preferred one isn't available
Repeat until your list is complete, then tap Create.
Step 3: Understand List Details and Actions
Once created, tap a list card to expand it. The expanded view shows all your items and several action buttons:
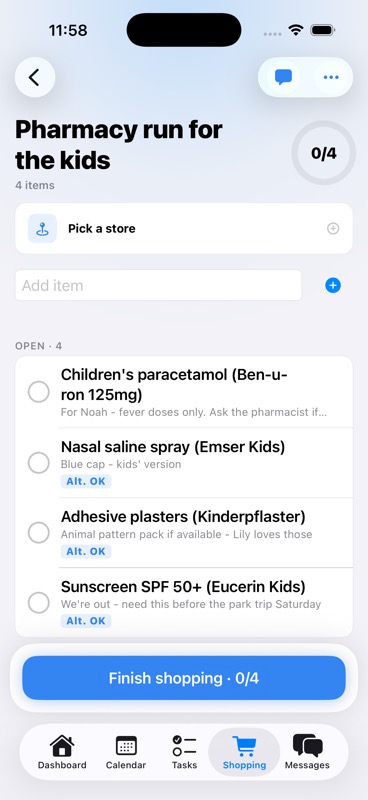
Item Details
Each item shows:
- Item name with quantity and brand preferences
- Notes underneath in smaller text (e.g., "Bio/organic, ~500g")
- Alternative OK badge — indicates substitutes are acceptable
- Check circle — tap to mark as purchased
Action Buttons
At the bottom of each expanded list, you'll find:
- Chat about this list — Opens a dedicated conversation thread for this specific list
- Reassign — Transfer the list to a different family member
- Delete — Remove the list entirely
- Complete Shopping — Mark the entire shopping trip as done
Step 4: Check Off Items While Shopping
When your au pair is at the store, they tap the circle next to each item as they put it in the cart. This happens in real time — you can watch items get checked off from home.
How It Works
- Your au pair opens the shopping list
- They tap the circle next to an item to mark it as purchased
- A green checkmark appears and the item moves to the Completed Items section
- The list header updates progress (e.g., "2 of 6 completed")
- You see the same updates instantly on your device
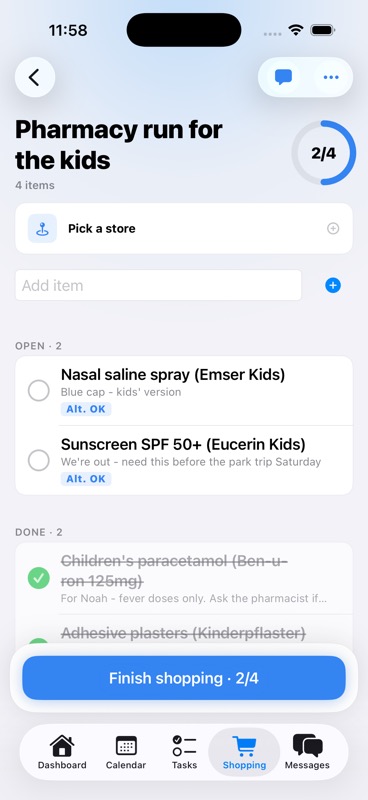
Completed Items Section
Items that have been purchased appear in a collapsible Completed Items section at the bottom of the list. This keeps the remaining items front and center while still showing what's already in the cart.
Adding Items on the Fly
Need to add something while your au pair is already at the store? Just type in the Add Item field at the bottom of the list. The new item appears instantly on their device too.
Step 5: Chat About the List
Every shopping list has a built-in chat thread. Tap Chat about this list to open it. This is perfect for:
- Asking "Should I get the large or small pack?"
- Sending a photo of two similar products to ask which one
- Confirming substitutions when a product is out of stock
- Sharing the receipt photo after checkout
The chat stays connected to the specific list, so conversations don't get lost in your general messages.
Step 6: Complete the Shopping Trip
When all items are purchased (or your au pair is done at the store), it's time to wrap up:
- Tap the green Complete Shopping button
- The completion sheet shows a summary:
- How many items were purchased vs. total
- A progress bar visualization
- Any unpurchased items flagged with a warning
- Add Completion Notes (optional) — e.g., "Store was out of strawberries, got blueberries instead"
- Attach a Receipt Photo — Snap a picture of the receipt for your records
- Tap Complete to finish
The list moves to your archive where you can review it anytime.
Step 7: Submit Expense Claims
If your au pair paid for groceries out of pocket, they can create an expense claim directly from the completion screen:
- During completion, toggle Create Expense Claim
- Enter the amount spent
- Attach the receipt photo
- The expense is automatically linked to this shopping list
- Parents see the claim in their expense overview for approval
This eliminates the awkward "how much do I owe you?" conversation and keeps reimbursements organized with full receipt documentation.
Step 8: Use Smart Suggestions
AuPairSync learns from your family's shopping habits. After a few trips, you'll notice:
Frequent Items
When adding items to a new list, AuPairSync suggests items your family buys regularly. Each suggestion shows:
- Frequency dots (1-5) — How often you buy this item
- Store checkmark — A green checkmark if you've bought it at the currently selected store
- One-tap add — Just tap to add it to your list instantly
How It Gets Smarter
Every time an item is checked off during shopping, AuPairSync records:
- Which item was purchased
- How often it's bought
- At which store
- The typical quantity
Over time, creating a weekly grocery list goes from typing everything out to just tapping through suggestions.
Step 9: Manage Your Shopping History
Archive View
Tap the archive icon in the top corner of the shopping overview to see all completed lists. Each archived card shows:
- List title and completion date
- How many items were purchased out of the total
- Icons indicating: unpurchased items, completion notes, receipt photos, or linked expenses
Tap any archived list to view a read-only breakdown of everything that was purchased, notes left by the shopper, and any associated expenses.
Why History Matters
Your shopping archive helps you:
- Track spending patterns over time
- Reference what was bought for repeat shopping
- Resolve any questions about past purchases
- Build up the smart suggestions that make future lists faster
Tips for Getting the Most Out of Shopping Lists
For Host Families
- Be specific with item names — "Whole milk 3.5%, Weihenstephan" is better than "milk"
- Use the Alternative OK flag — Mark items where any similar brand works, so your au pair doesn't have to call you for every substitution
- Add notes for tricky items — "NUT-FREE alternative to peanut butter for Lily" prevents mistakes
- Start with draft mode — Build your list over a few days as you notice what's running low
- Check the archive before creating — Your last list is a great starting point
For Au Pairs
- Check off items as you go — The family can see your progress in real time and feel at ease
- Use the chat when in doubt — A quick photo of two similar products is faster than guessing
- Take a receipt photo — Even if you don't need an expense claim, it's good documentation
- Add items you notice are needed — If you see something running low at home, add it to the draft
Troubleshooting
"I can't see the shopping list"
- Make sure the list is toggled to Ready for Shopping (not still in draft mode)
- Verify the list is assigned to you or to "Any Au Pair" / "Any Parent"
- Pull down to refresh the shopping overview
"Items aren't updating in real time"
- Check your internet connection — real-time sync requires connectivity
- Close and reopen the app to re-establish the connection
- Ensure both devices are on the latest app version
"I accidentally completed the list too early"
- Completed lists move to the archive and cannot be reopened
- Create a new list with the remaining items — use smart suggestions to quickly re-add them
"The expense claim amount is wrong"
- Expense claims cannot be edited after submission
- Contact the parent through the message hub to discuss adjustments
Open the Shopping Feature Directly
You can deep link directly to a specific shopping list using:
aupairsync://shopping/{listId}
This is useful when sharing a specific list via other channels or when the app sends you a notification about a shopping list update.
Try It Yourself
Ready to make grocery shopping effortless for your family?
Download AuPairSync and create your first shared shopping list today.
Related Feature Guides
- Managing Tasks with Photos and Context
- How to Set Up Your Family Dashboard
- Streamlining Communication with the Message Hub
Learn More
- Shopping Feature Showcase — See the full feature overview
- Use Case: Grocery Shopping — Real family story
- Coordinating Schedules with Shared Calendar — Plan shopping trips around everyone's schedule
Questions? Contact us at support@aupairsync.com
Ready to simplify your au pair life?
Tasks, calendar, messaging and more — all in one app.

Related Articles

How to Set Up Your Family Dashboard
Complete walkthrough for setting up and customizing your AuPairSync family dashboard. Learn how to configure widgets, organize information, and create your family's command center.
6 min read

Managing Tasks with Photos and Context
Learn how to create clear, visual task assignments using photos and detailed context. Make task completion easier for your au pair with step-by-step visual guides.
7 min read

Coordinating Schedules with the Shared Calendar
Master family schedule coordination using AuPairSync's shared calendar. Learn best practices for managing events, avoiding conflicts, and keeping everyone in sync.
6 min read